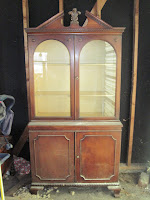
Here are some pics of it that she sent me -
It was pretty beat up as far as the lower cupboards and hardware went. The left door hinges were completely stripped out of the wood - I mean, the wood where the screws went was all crazy and needed fixing so the screws would actually stay attached. However you say that ;)
I debated with myself a lot about the doors. They could have been really cute with some bright bold print fabric...But in the end, I decided to remove the upper doors, the curley-swirley (highly technically term! although, it's most likely called a fleur de lis..I like to call it 'that Welshie thing' to upset my husband) on top (which was an odd removal, it wasn't really attached. I put my hand there one day to move it around and the fleur de lis just popped right out. I've held onto it just in case there's a sudden rash of cool fleur de lis projects all over the internet)(which ensures that there will never be!), and add 1x2s to the upper half edges. Doing that bulked it up nicely and covered the spots where the hinges had been -
I removed all the hardware and then found this on the top -
So, I removed it and decided not to replace it -
On the finished piece, I just have it primed then set some fairy lights up there. You can't see them, just a nice glow at night.
Here it is in the process of being sanded and wood filled, you can see the extra wood I added to the front -
After copious use of a tack cloth, soap & water, and a can of air I moved it into the house...After all, at this point it WAS December! I did partially do the shelves & cupboard doors in the garage, as I was spray-priming those (which I wish I had done with the entire unit, but meh, live and learn...I need to make friends with spray paint because painting all the detail bits on this just stressed.me.out!) -
I had asked the original blogger where she'd found the wallpaper for the back of hers, since I liked it so much, but she never replied :( I had decided not to paint the entire inside of the bottom black, as that seemed a good way to lose things, so I painted the back turquoise. I was stumped as to what I wanted to do behind the upper shelves. Old map - couldn't find one I liked that was the right size! Wallpaper - Never found any I loved!! Paint - meh, boring! Pressed tin ceiling tiles - I found some I LOVED but they were 20$ each at Blue, with a minimum order of 5, which was more than I wanted to spend on this and more tiles than I needed. So, I ended up just painting it turquoise too! Some day I'll figure it out, but for now it's fine ;)
I wood-filled the left hinge screw holes, and sprayed the knob with some Rustoleum satin nickel metallic spray. I may end up doing the hinges the same, but they blend pretty well right now so it's not a priority.
And here she is, in the dining room corner with some random things on it till I decide what I want. Well, I don't want the Lego log cabin, but I'm not the one who put that there ;)
I LOVE it! I need a picture or two in there, and maybe a small plant - I think I've seen some 'grow grass in an eggshell' pins lately on Pinterest, that might be fun!
Things I learned this time - spray paint (or a paint sprayer) is your friend when it comes to fiddley bits. I wouldn't do high gloss again, it's just too shiny for me. I'm sure there's more but the log cabin has been placed between me and my keyboard - He thinks I've taken too long on this post, and he's right.
P.S. - The black is Silhouette by Martha Stewart


What a difference! I like the modern look of it. It no longer looks like that old, antique-y, dusty, no longer wanted thing hanging out in the garage! Good work!
ReplyDeleteIt's not a fleur de lis hon, it's the Prince of Wales' feathers - found on 2p's and rugby shirts etc. the fleur de lis is the symbol of the Saints (The Third Street ones of the Row and also the American football team). They do look a little alike though.
ReplyDeleteLOVE!
ReplyDelete